photo 93a8f961-441a-4b6d-b7a1-c12c0305bea3.jpg

Tuesday, August 19, 2014

My insta crafty love

Wow, I can't believe my last post has been over 2 months ago! Summer is almost over (yay!) and September is around the corner...my favorite time of year is approaching. I have been working and Project Life-ing and been over on my new crafty instagram account that you should totally follow! I am sharing my layouts and hauls over there with bits and pieces of my everyday life sprinkled in. I just found it hard to keep up with it all... doing the actual scrapbooking process, taking photos of the layouts, editing them, and then blogging them. It kinda took the fun away and felt like a chore. Anyone else ever feel like that? Maybe my next phase of this blog will be about knitting. More writing, less process. IDK when, but I'll be back when I feel like it.

Take care and follow me on IG where I will be posting daily crafty love!

- the crafty love girl

Monday, June 2, 2014

Tutorial for Windows 8 phones: How to make 2- 3x4's on a 4x6


Do you have a Windows 8 phone? I love mine, but feel somewhat disappointed when it comes to finding an app that is helpful for creating collages and printing photos for Project Life. Many of the PL groups on facebook talk about great apps for iPhone and Android (Collect, Picframe, to name a few...)

Fellow Windows 8 users, I have discovered an app that makes my PL process so much easier and today I'm going to share a tutorial on how to create 2- 3x4 photos on a 4x6.

Step 1: download the PicsArt app in the Windows Store

Step 2: open the App and tap the "Collage" button

Step 3: tap the "Grid" option

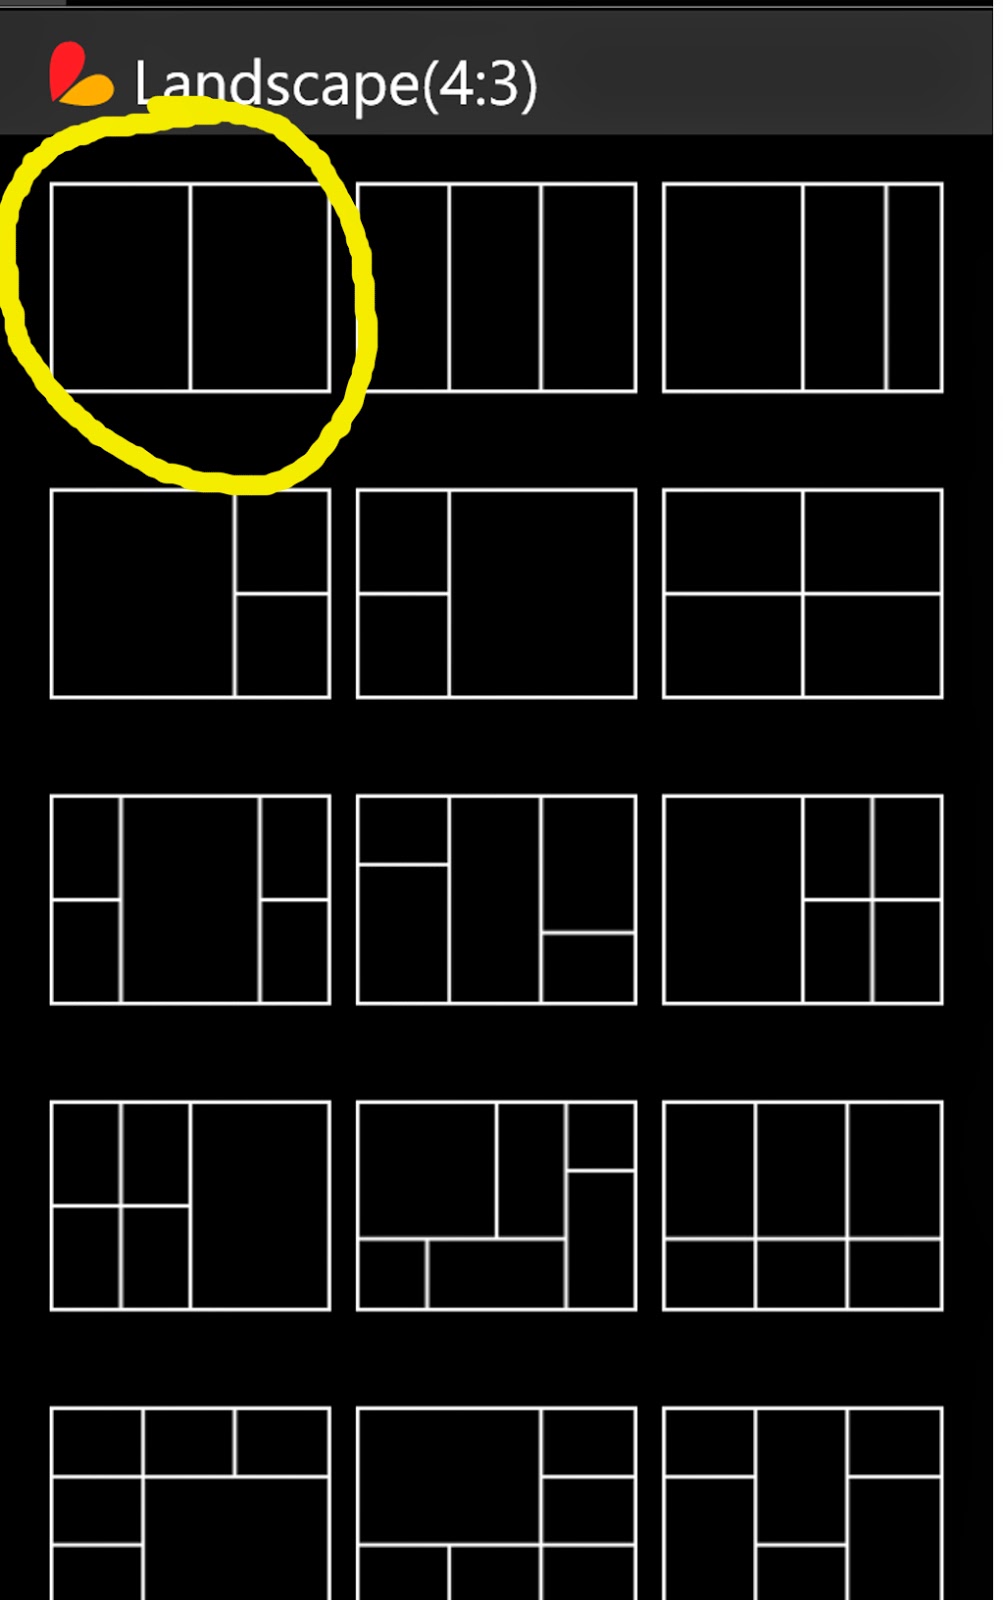
Step 4: Select "Landscape (4:3)"

Step 5: Select the grid design with only 2 boxes
Step 6: 
Here you will see a few tools. The border width is set by default at 20. I set my border to 3 and after the photos were printed and I cut them in half, there was just a small amount to trim. I want these photos to fit inside the 3x4 photo pockets for my project life page protectors. (Next time I may try border 0, I just wasn't sure if it would cut off some of my photo if I did that). If you want a border around your photos by all means set your border width to whatever you like! This is for your project life! Drag the blue dot to make the border width smaller or larger. By tapping on the gray box the settings will go away. 
Step 7:
Now tap "add" to select the photos you want. It will take you to your gallery, or other places like your facebook albums.

 Step 8:
You're almost done!! Tap the save button! From here, you can edit your collage further by using different effects, or adding text if you want.

That's it folks! Now that you have saved your collage, it is ready to be printed. This will print as a 4x6.  I send my photos to CVS to get printed, so when I got them, this is how they turned out. I just cut them down to size and did have to trim slightly to get rid of the border.


This is a collage that I forgot to change the border from the default width of 20 to 3. I had to trim more and the photo was slightly not as wide since I had to cut more off of it. It really wasn't noticeable once I had them in the page protectors.

If you want to make 2 photos that are in a "landscape" setting you can do exactly what we did above and just rotate the photos so that they are on a 90 degree angle. Or you can choose "portrait (3:4)", select the 2nd collage design, and upload your landscape photos this way.


For those of you that have Windows 8 phones, I hope that you were able to learn how to make life a little simpler when it comes to getting ready to print your photos for your Project Life layouts. This app has been very helpful to me, I hope you will find it useful as well! If you have any questions or comments, please feel free to leave a comment below!
- the crafty love girl


All about Gossamer Blue

My layouts today are from Gossamer Blue's Life Pages May kit.

 photo WP_20140520_0021.jpg


 photo WP_20140520_0081.jpg


 photo WP_20140520_010.jpg


 photo WP_20140520_013.jpg


Since becoming a GB subscriber (my first month was May) I am doing the album challenge! If you are a GB subscriber, there is an opportunity to earn a free album if you create 4 layouts/spreads with the monthly kit & upload those photos to their gallery. So after 5 consecutive months, if you have posted 20 layouts you will be shipped an album free of charge in your 6th month! How cool is that?!

In my previous post I shared LO's using GB for week 18 and 19:

 photo GB.jpg
Here are my new LO's using GB:

Week 20 continued...
 photo 808f9873-ec36-4679-ac96-1c73b768ae53.jpg


 photo 1815f4f7-f8c7-4f21-be6f-6e6b0d575434.jpg


 photo IMG_6250.jpg


 photo IMG_6253.jpg


This month's journal cards and embellishments were bright and colorful, a little out of my comfort zone. I usually like to use more muted colors. I checked out the June kit and I definitely like it much better!

If you want to join GB, you can visit their website here. They have kits for scrapbooking and pocket style scrapbooking that you can purchase through a monthly subscription or you can buy a kit individually in their store.

If you do become a subscriber, you can get a referral gift by clicking on the info tab and then click the contact us link. Or you can click here. All you have to do is send a message with the name of the person who referred you. Feel free to use my name, Lindsey Stewart and we can both get a gift! A person on facebook recommended this kit club to me, so I used her name as a referral and this is what I got! So generous of them!

 photo WP_20140520_0141.jpg


Here is a look at the June Gossamer Blue Life Pages kit:

I hope you enjoyed my GB LO's! I'd love to see what you have done with your GB kits, share or link below! Have a wonderful Monday!
- the crafty love girl

Sunday, May 25, 2014

On a roll...Weeks 16 - 20

Here are my most recent pages that I've completed. The best part was getting them all done in one day. I find that I work better when I let 4 or 5 weeks pile up so that I can't remember what happenned. NOT! It was hard because I didn't journal much for weeks 16, 17, & 18 so those weeks just got one page. I think its more simple that way, but I'm missing out on the details! So to my future self: use my PL journal (the super cute one I got on Etsy) and write a recap of every day. That way I've got more things to journal about! This was me at the start... should've taken a pic of it at the end! It was so clean LOL.

 photo ca9e2c73-799c-4322-8fd0-50aa6d491762.jpg

Also, I finally found an app for Windows 8 phone users that really helped me create the 3x4 sized photos. I made a collage with 2 photos on a 4x6. Super easy, I will share a step by step on how to do that in my next blog.

Week 16
 photo IMG_6203.jpg

Week 17 (excuse the blurry pic!)

 photo IMG_6207.jpg

Week 18 (using products from my first Gossamer Blue Life Pages kit!)

 photo fd54b6fc-8c54-4414-a227-35ca41cf000f.jpg

Week 19 (Gossamer Blue)

 photo 54fa7353-bb0e-44b2-9bd8-96a553039ee7.jpg

 photo 5cd87c94-b0fd-476f-bb2b-2b685ba9b7b4.jpg

Week 20 (Gossamer Blue)
Lots of LO's for this week, my sister graduated college and my grandparents and I went on a road trip to get there! Tons of photos! I took all of these with my phone. I still have at least 2 more LO's for my sister's grad pictures, just waiting to get them from my Mom because we took some on the digital camera.

 photo 7aff3a94-e573-4cc3-a8ee-cc5c8f800a40.jpg

 photo 602cc1d7-bbe8-4ce1-bb58-30100a9c97e4.jpg

 photo 34f1a926-9625-4401-9b3c-cb9f6098d1cf.jpg

So that's all I've got for now! Happy scrapping! 
- the crafty love girl


week 15

Viola! Here is my week 15 LO. Enjoy!

 photo IMG_6199.jpg

 photo IMG_6200.jpg

 photo IMG_6202.jpg

- the crafty love girl

week 12 - 14

Definitely behind on sharing my layouts. So here's what I've got, hope you like it!

 photo 7.jpg


 photo 6.jpg


 photo 1.jpg


 photo 3.jpg


 photo 2.jpg


 photo 5.jpg


TTFN!
The crafty love girl

Thursday, April 17, 2014

Sharing week 11

Been a little busy lately, so i'm gonna cut to the chase! My pages for Week 11 are done! I figured out how to make collages in GIMP so that I could print multiple photos in a 4x6! This has really helped me include more memories on one page. I'm a little proud of myself...it was super easy! I found this blog very helpful!

I included the cute stamped envelope and note my Secret Sis wrote me and also a little card that came in the box from my new perfume Chloe :) And that Chicken Fried Steak was the BEST!

Embellishments from Freckled Fawn, washi from my Secret Sis, a few cards from Studio Calico.

 photo IMG_6062.jpg

 photo IMG_6075-1.jpg

I hope to get more PL done to share with you soon! I have gotten some goodies that I will share as soon as I get the photos taken. Goodnight blog world!
- the crafty love girl


Tuesday, March 25, 2014

Speedy read and my Secret Sis

Good morning yall! My goal was to get some Project Life done on my time off from work which I did, Yay! ...and also started and finished a book in 2 days which I have never done, ever!! Of course I've read books, just not like a speedy gonzales. It is the book based on the movie Divergent, written by Veronica Roth. It is a triology (I love trilogies!) and so I am very anxious to read the next two! I wasn't interested in the movie at all, I thought it was another 'Hunger Games type' but I loved the book! Highly recommend it, folks! And can't wait to see the movie now!!

I mentioned last time that I participate in a Secret Sister Swap on Facebook. It is so fun! We got paired up anonymously by the admins and they had us answer a questionnaire when we started to get an idea of what our SS's style is and what she likes. It is for a 3 month period with a minimum of $15 for each package. We will reveal ourselves the last month! It is really neat seeing my SS share her photos of the package I sent her on fb and seeing how excited she is! My SS did so good! I love everything, thank you SS!!  I promised pics of my first package from her, so here ya go!


I got week 9 and 10 done, still have to do 11 and 12. It has been a few weeks (almost a month!) since I sat down and really pumped out some pages so I felt a little slower starting out. My creative juices started flowing finally! Embellishments are from FF and a few from my Secret Sister! 

 photo IMG_6037-1.jpg


 photo IMG_6043-1.jpg


I love the pic of Ollie that I did. She was originally in the back of the truck with a maintenance van in the
back. I cut her out, added some stamps and viola!!


Love the navy thickers from Studio Calico's Office Hours kit this month!
 photo IMG_6052-1.jpg


 photo IMG_6059-1.jpg


So that is all I have for you this time, I'm going to crank out some more layouts before I go back to work tomorrow. Now go read Veronica Roth's Divergent!

Have a marvelous day!!
-the crafty love girl